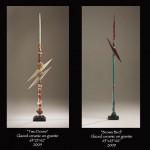
Sculpture IS is coming up on its 5th annual show at Sierra Azul Nursery & Gardens, located at 2660 East Lake Ave. Watsonville, CA 95076.
The sculpture garden exhibit will be open to the public May 31st to October 31st.
Please join me for the reception on June 5th from 4-7pm.

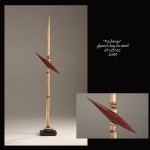
“Red Trees with Green Leaves” by Susana Arias.
Ceramic sculpture in the permanent collection of Sierra Azul.
Category Archives: Exhibits
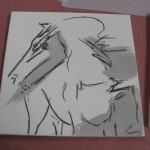
Horses
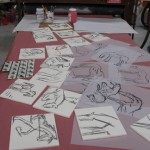
This is a presentation of the process I used to create these horse paintings.
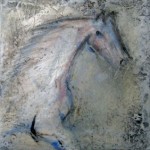
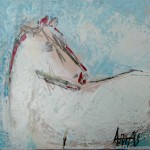
The pieces have to be 6″X6″ and the idea is to produce 50 pieces in 50 days.
Thus the title of the exhibit “50/50”
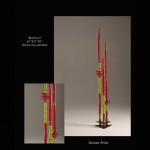
Sanchez Art Center * 1220 Linda Mar Blvd. * Pacifica, California
July 30 to August 29 * Ticketed Preview July 29 7-9 pm * Opening Reception July 30 6-10
I start by making a drawing with an under-glaze pencil, then I use glazes to highlight some areas.
After the tiles come out of the kiln, I paint them with oils and encaustic medium.
I hope you enjoy the process.
This is a link to the wikipedia explanation of encaustic.
Making Clay Birds colored with Terra Sigillata
This is a step by step presentation on how to make stylized clay birds and the use of Terra Sigillata to color them. How to burnish them, and after a cone 019 bisque how to smoke them in a can. The bisque can go to cone 06 if the ware needs to be stronger.
The most important points when building a sculpture that you are going to burnish are: 1. score the clay very well, 2. make sure there are not many nooks and crannies, 3. make surface as smooth as possible
Terra Sigillata is a thin slip used to coat dry green ware to get a high satin gloss without a glaze, by using either a soft cloth to polish or a rock depending on the kind of sigillata you use.
This is a good project for everyone. I have taught this to grades K-8, and I have used this process in my own work.
If you do not want to smoke the pieces, you can: 1.leave them with the sigillata, 2. put them in a saw dust can fire, 3. oxidation pit fire, 4. reduction pit fire, or you can skip the whole terra sigillata part and just glaze them after a cone 04 bisque.
This is a picture of some of my Terra Sigllata Bowls. 
These bowls were made with a very basic terra Sig of ball clay and talc, and lots of elbow grease with a polished rock. What I like about this finish is that the rock gives the clay a texture from the direction in which the rock is rubbed. Creating a pattern that can enhance the piece.
HOME
Sculptures at the Art Center
The Mountains Art Center, one of Santa Cruz County’s treasures, not only has a wonderful gallery representing many of our local talents but is now setting up their gardens for the exhibition and sales of outdoor sculpture.

This is one of my sculptures “Logs with Nests and One Egg” shown at the Art Center Gardens.
Art 4 Art 2010
“Art for Art” A SALON-STYLE EXHIBITION FEATURING 30 ARTISTS
Art for Art is dedicated to providing support for Santa Cruz County’s arts community as well as its artists by hosting exhibitions representing a cross-section of today’s contemporary art trends and donating a percentage to various art related organizations.
OPENING RECEPTION: Friday, May 28, 5:30-9:00 ($5 suggested donation, includes a raffle ticket).
EXHIBITION: Saturday, May 29th & Sunday, May 30th from 11:00 to 5:00 – FREE!
CLOSING RECEPTION: First Friday, June 4th ($5 suggested donation, includes a raffle ticket).
A percentage of all profits will be donated to create a new Artists Assistance and Relief Fund. Please look under OUR MISSION for more information.
If you want to see more of my sculptures visit my web site
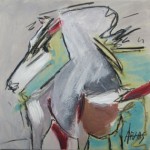
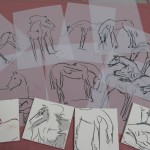
Drawing of Horses
I am getting ready for an exhibit at The Sanchez Art Center in Pacifica, California from July 30 till August 29.
There will be a ticketed preview July 29 7-9.
It is called 50/50. The idea is that each artist will create 50 pieces in 50 days. The start day is Monday May 17th, so I decided to start getting ready since my works are on clay which is first glazed and then painted with acrylics or encaustic. Here are some images of my starting points.
My friend Barbara Downs is also in the show and has a great Blog to follow
Making a Ceramic Tiles Chair
This is a step by step project on how to make a ceramic tiles chair. Beginning with the stucco armature, covering it with foam to allow for the 10% shrinkage of the clay, draping and sculpting the clay, cutting it into tiles, bisque and glaze firing the tiles and finally using thin set to attach them and grout to finish it up.
Bathroom Tiles
I just made a bathroom floor, shower floor, trim for around the bathroom door, trim for the floor and a sink. the bathroom is not finished as in the faucets and toilet are not in, but the tiles and sink are in and it looks great. Here are some photos.


Clay Chair
I posted the video on how to make clay bamboo. The new post will be on how to make a clay chair. Here it is with clay draped and sculpted over a stuccoed armature. Next, I will cut clay into tiles, bisque and glaze them, and then thin set the tiles back onto the stuccoed armature. As soon as I can have the video I will post it. It may take 3 weeks to complete. 
Here is the image of the chair today after cutting the draped clay into tiles. 
This is a picture of the stuccoed armature for the chair above

Tiles ready for glazing 
Glazing tiles, almost to the end. In about four days I’ll be able to put it all together.
How to make ceramic bamboo tiles
This is a step by step video on how to make ceramic bamboo for you walls. Is also shows how to glaze and install the clay bamboo.